How to Use Edge Paint

If you can paint a wall, you can use edge paint.
— Unknown

Sure, it’s a little more complicated than that, but it’s pretty much the same concept. Edge painting is actually much easier than most people think.

I know you’re eager, but before we jump into the ‘how to’ part of this blog post, I just want to take a moment to talk about why edge paint is as popular as it is, because when I first heard about it my response was: “I will never use that &@#$.” And now, well, I use it.

WHY: EDGE PAINT

Any leather item you make really should have a finished edge of some sort. Turned, burnished, painted, whatever it is, finishing your edges will drastically improve the quality of your work. As I mentioned, when I first heard about edge paint, I really had no intention of using it. Unlike burnishing, which is a process that effects the leather itself (you can read more about that here), edge paint is something that you add to the edge of the leather and then build up by applying multiple layers… just like painting a wall. My logic was, “Why would I finish my edges with something that can peel off, when I could just burnish them.” But, as it turns out, whether or not to use edge point has more to do with the leather you are working with. It’s a situational kind of thing. I’ve been using edge paint for awhile now and I’ve yet to see it peel (although it may over a long period of time, but the effects of burnishing go away with wear as well). Edge paint is also associated with high quality or ‘fine leatherworking', because of the smooth consistent finish it gives.

When: Edge Paint

Like I said, using edge paint is more of a situational decision. As I started working with more kinds of leathers, I realized not all leathers burnish well. Leathers that are thin, supple, and pliable, generally do not burnish well. If the edges happen to be firm enough to create the friction you need to burnish, often those edges will get mashed, especially when using a wooden burnisher. Or, as is usually the case, the edges aren’t firm enough for that to happen. In situations where the edge needs to be exposed, but the leather is too soft to burnish, it’s a really good idea to use edge paint, because with out it, there’s really no good way to get an edge with a consistent finish.

How: Edge Paint

If you’ve burnished an edge before and you’re thinking, ‘I’ll just finish an edge like I normally do, and use edge paint when I normally dye the edge,” don’t think that! Edge painting and burnishing are completely different processes, so it’s best if you forget about burnishing for the time being. 

Temporary memory loss applied, let’s begin.

This is a watch strap I was working on. In this picture I've glued both pieces together and evened out the edges with a knife.

1. After you’ve glued your leather together, even out your edges with a knife. I’ll usually just run a knife straight down the edge, blade flat against it. If you have it angled, just be careful that the knife doesn’t bury and cut deeper into the leather than you planned.

Make sure to get your edges as flat as possible in this step, because it’s the last time you’ll be shaping the leather. This is one of the major differences with burnishing, there is no sanding the leather to even out edges.

First coat of paint applied... just waiting awhile for it to dry.

First coat of paint applied... just waiting awhile for it to dry.

 It’s okay to sand edges when burnishing because you will also bevel your edges with an edge beveler. When you sand, the gain (topside) of the leather with start to fold over, and beveling removes that folded over part. But, when you’re working with thin leathers, you generally can’t bevel. There’s not enough leather to bevel, you’ll just cut the entire way through it. Long story short, don’t sand, don’t bevel, just even out the edges with a knife.

First coat once it has dried. You can see the fibers and uneven parts through the layer of paint.

2. After you’ve done that, apply the edge paint to the edge. Applying edge paint can be a little tricky because you absolutely have to keep it on the edge. If it spills over the edge, unto the leather, it will stain the leather. For that reason I use this tool. Make sure to apply a nice even and smooth coat. If you see the paint has pooled in one area, make sure to spread it out.

3. Allow 10 minutes (at least) for the paint to dry. Depending on the paint your using, it may be longer. You can generally tell by looking, but don’t rush this part because it will ruin your edges if you move on before allowing it to dry. As an impatient person, I’m talking from experience.

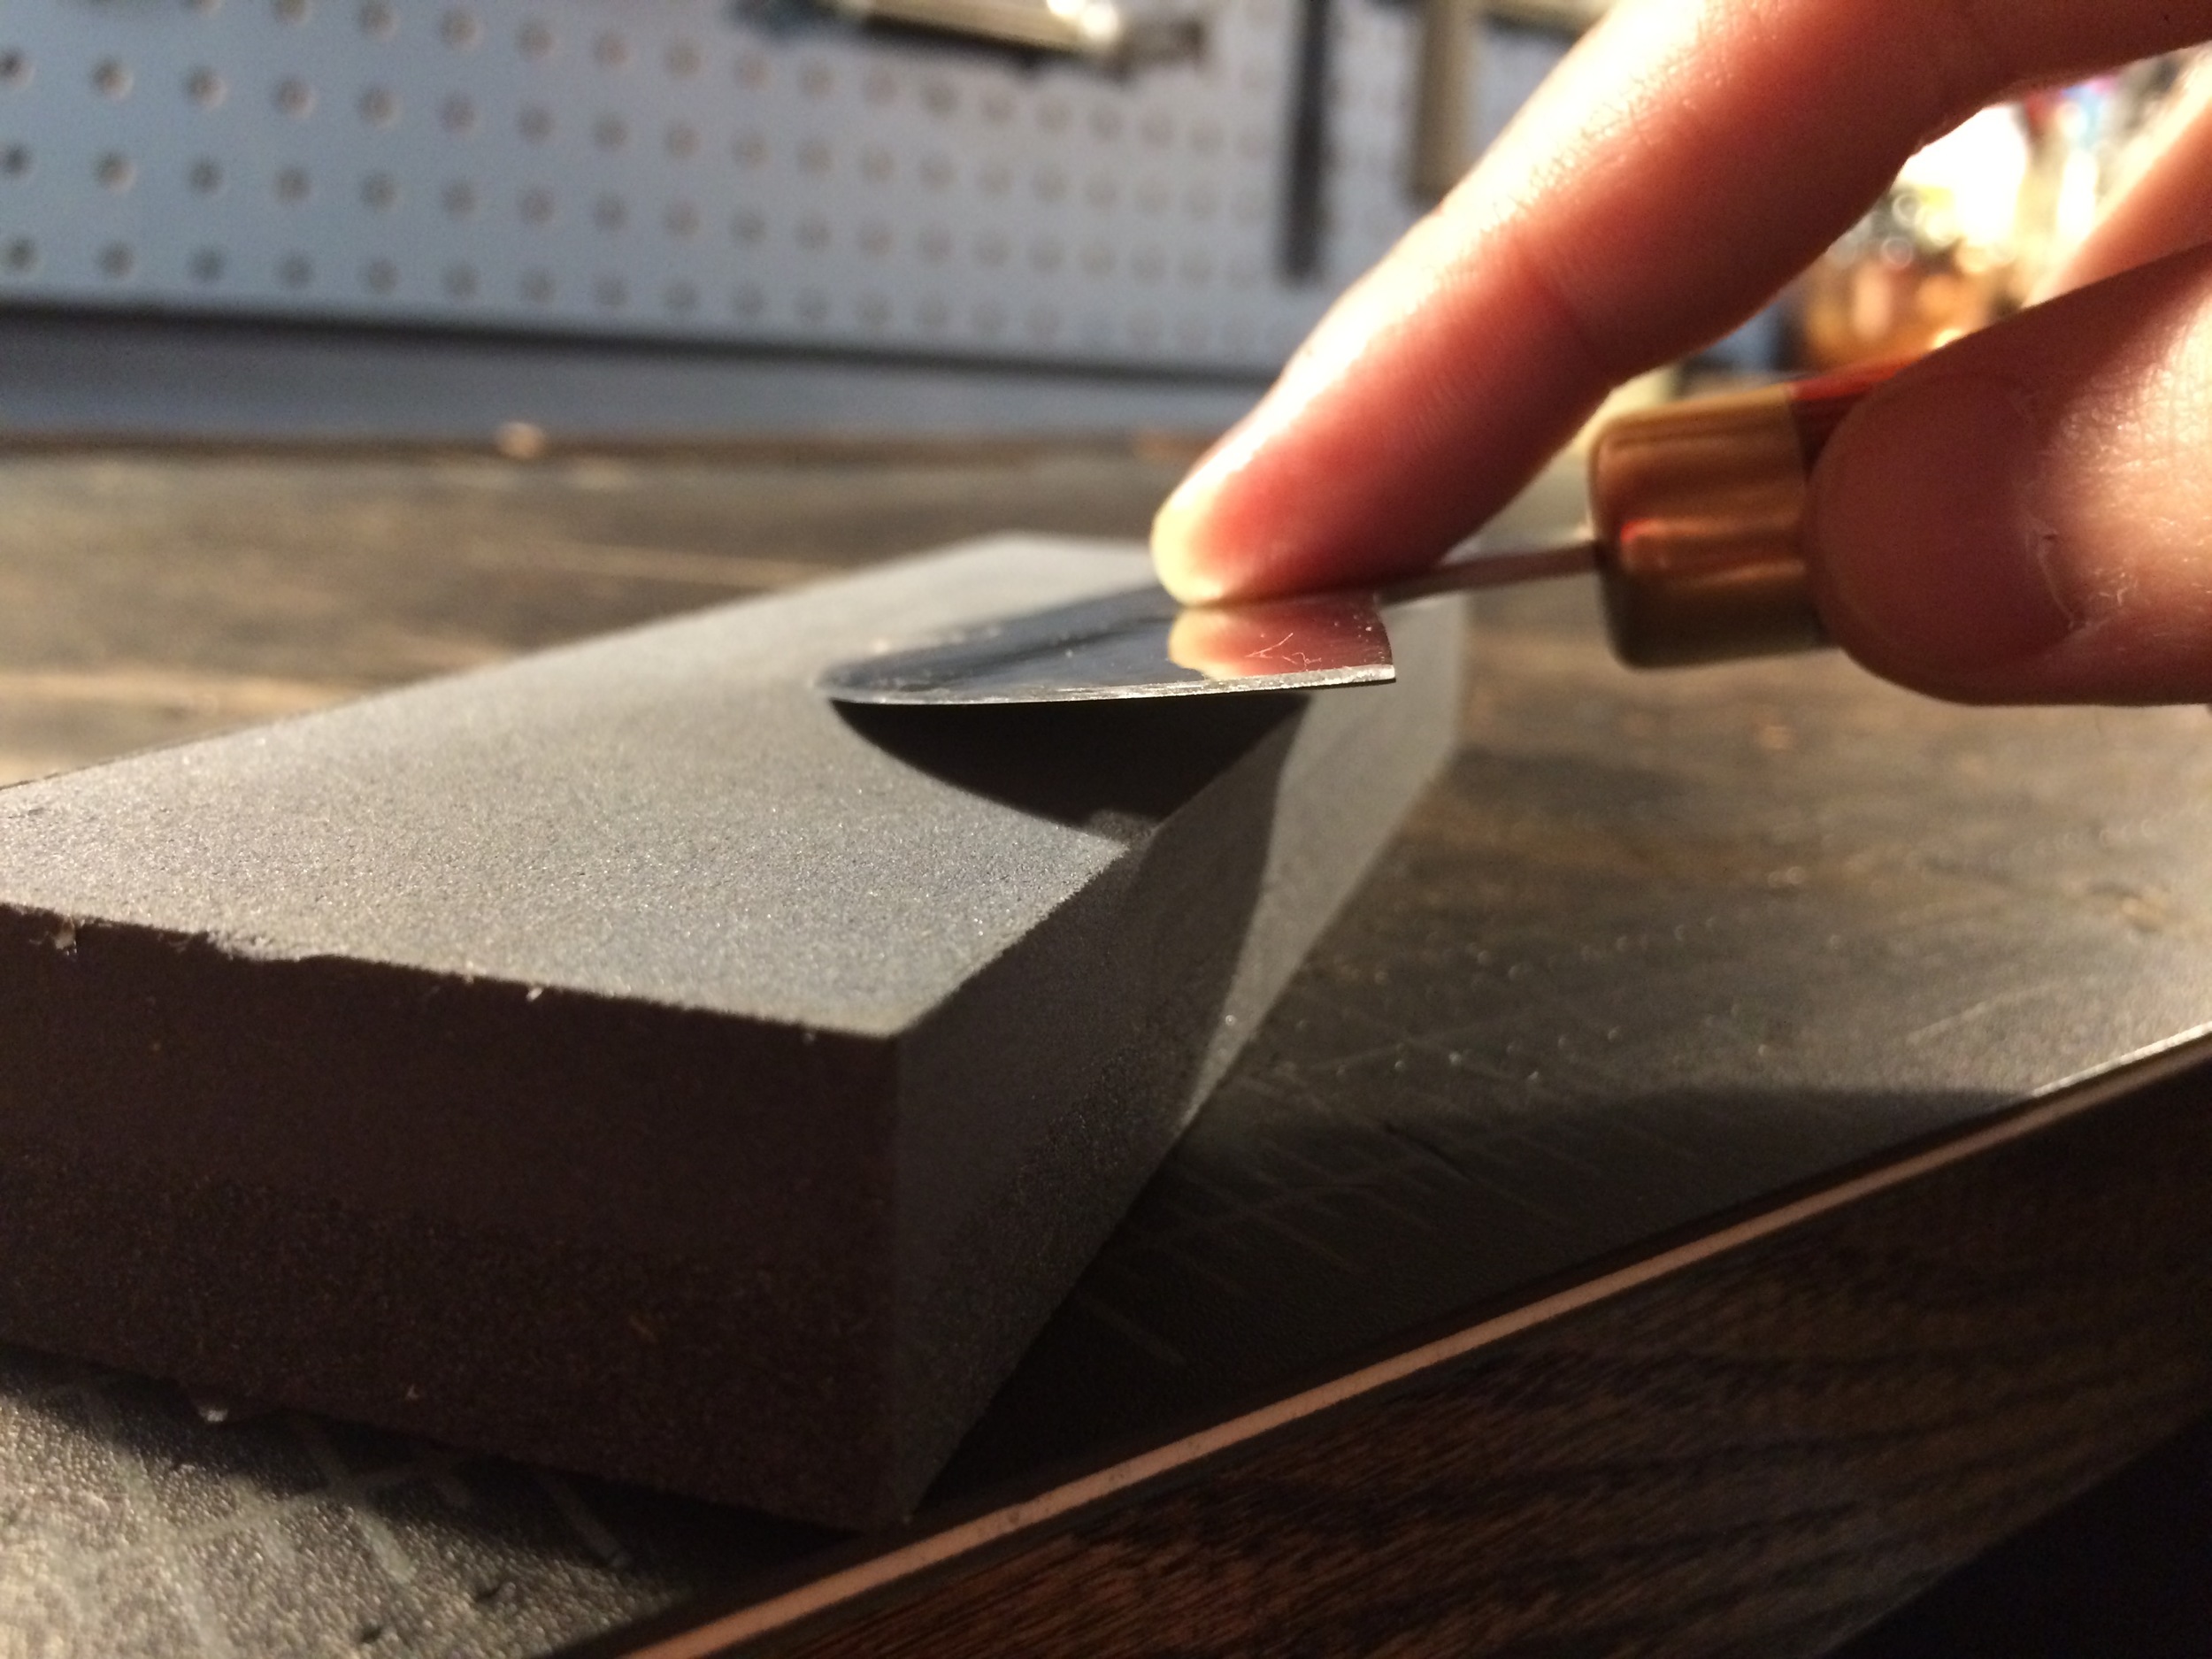
4. Next is where sanding comes in. Like I said, at this point, there is no more shaping of the leather itself, so you’ll only be sanding the layer of paint you’ve applied. Hit it lightly with 800 grit sand paper. This is just to help the second layer you are about to apply adhere to the previous layer.

This is my first two layers just after sanding. You can see a few inconsistencies. The one in the middle and the one on the right were caused by not waiting long enough for the paint to dry. The one on the left however, was from not enough paint. I should've applied another coat and evened it out again, but I did not and you will see the mistake in my final product.

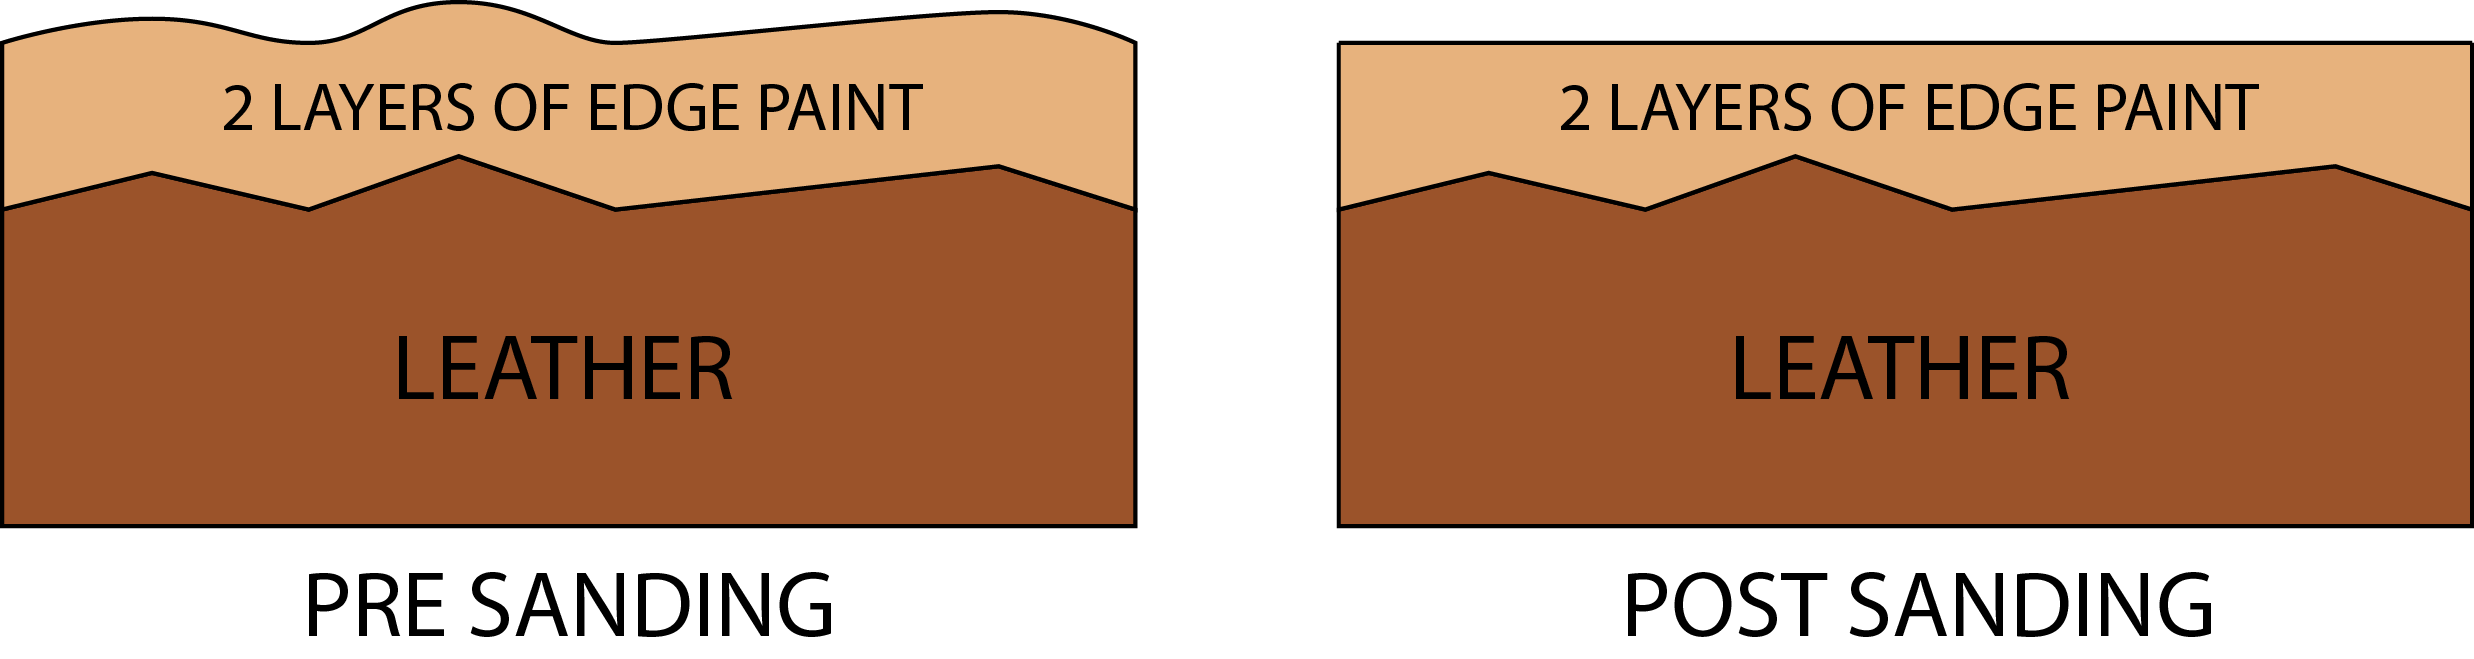
5. After you’ve applied a second layer and allowed it to dry it’s time to sand again, but this time with a different purpose. This, in my opinion, is the most important step in getting nice edges using edge paint. If you look at your edge up to this point, you’ll still see the imperfections that were in the edge of the leather in the edge paint (i.e. the crease where the two pieces of leather meet, loose grain, etc.). Now’s the time to get rid of those, otherwise it’s going to take an absurd amount of coats until it smooths out. I hit the edges with 600 grit sand paper, and sand the paint until it is flat and all the previous mentioned imperfections can no longer be seen. Again, you’re not sanding until you hit the leather, you’re just sanding the paint you’ve built up to even it off.

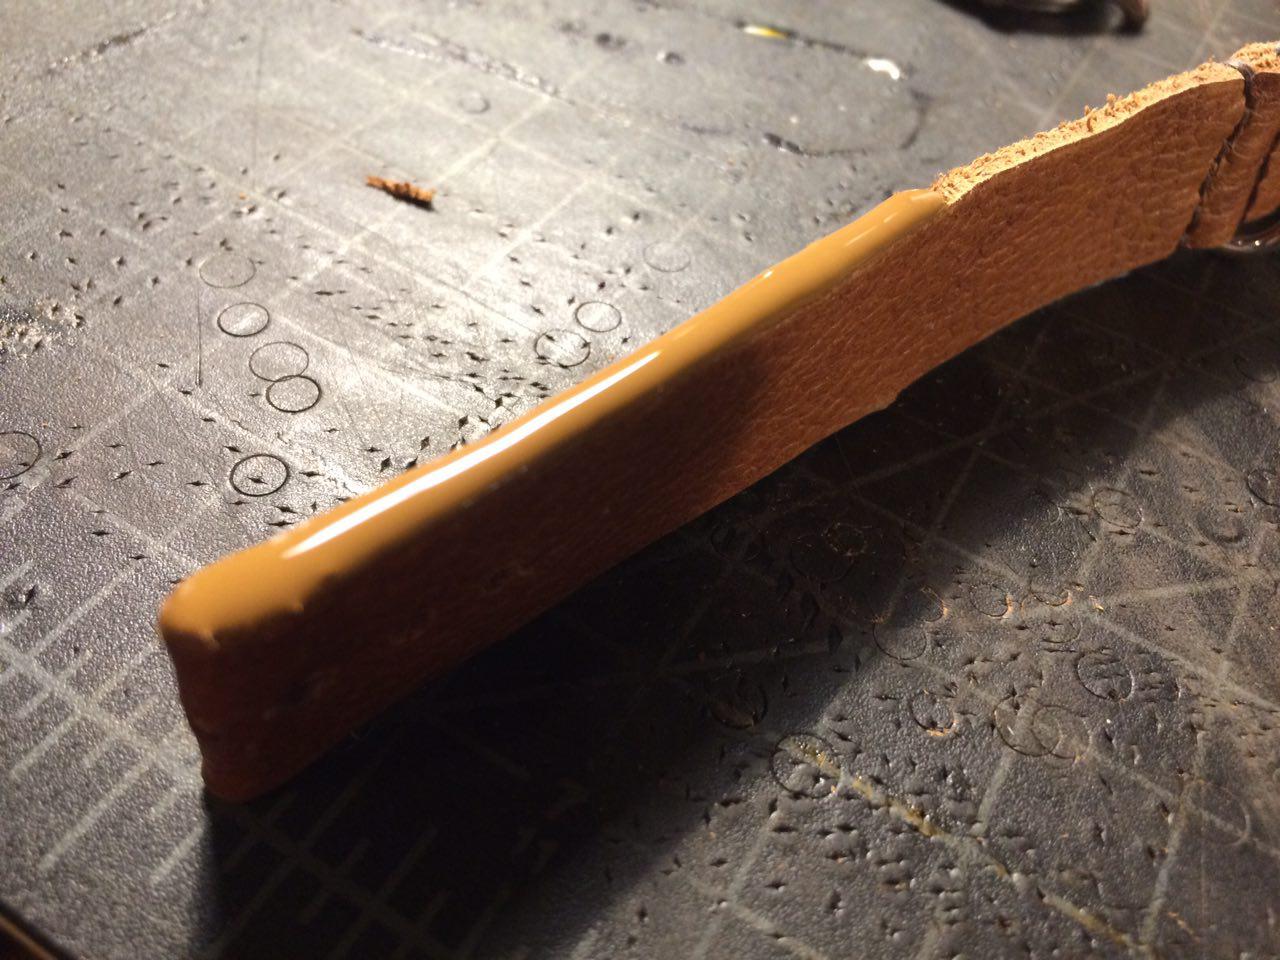
This is the final product after a few final coats, hitting lightly with 800 grit sandpaper, and then buffing with a piece of canvas. As I mentioned earlier, you can see my mistake on the very end, but other than that I'm pretty happy with how it turned out.

6. Finally, I will usually do 2-3 more coats depending on how much I had to sand off. I make sure to add enough until the edge looks rounded instead of flat. After the final coat is done drying, I'll hit it lightly with 800 grit sand paper, and then buff it with a piece of canvas. 

What: Edge Paint

The edge paint I use is called Vernis Edge Paint.

Who: Edge Paint

So, I really want to see what your projects look like finished with edge paint. If you’d like to share what your working on please follow me on Instagram @goldbarkleather, and tag your photo with #goldbarkbrag. That way, I get to see what you’re making, and I’ll feature it if it’s some of the best of your work!

Sharpening your Head/Round Knife

It is probably one of the best feelings in the world when your leather knife is sharp and cuts through the leather like butter. Your cuts are easier, the look a heck of a lot better, and in general it’s a more enjoyable experience. I don’t experience this often though. And it’s because I’m lazy when it comes to sharpening my tools.

So in attempts to be a better leatherworker, and be a more helpful blogger, I’ve been forcing myself to get in the habit of sharpening my tools. Out of this time, I’ve decided to blog a series about keeping your tools sharp, that will cover, you guessed it, how to sharpen each of your leatherworking tools… that need to be sharpened (sorry burnisher). 

For starters, most any knife that you order will not come sharpened. There are, of course, a few companies that break this mold, but generally this is not the case because it’s easier to ship things when they aren't deadly sharp. This tutorial will help you sharpen your new dull blade, and also maintaining that blade once it’s been sharpened.

The 15º Rule:

When sharpening or stropping, always keep the blade angled 15 degrees from the stone. Generally, the lower the angle, the thinner the edge will be, and the better the cut. I don't think it's a good idea to go much lower than 15 degrees because you run the risk of scratching the face of the knife. You also won't want your blade higher than 15 degrees. I imagine you could still get a decent cut out of it, but the knife will not cut near as well. 

What You'll Need

  • A knife to sharpen, duh.
  • Oil for your sharpening stone. Not all stones use oil, make sure yours does
  • A scrap piece of leather, usually 8oz or more
  • Jewelers rouge
  • A sharpening stone. My sharpening stone has two sides. A high grit side and a low grit side. You'll need to have a stone with two grits or two separate stones with different grits. 

Sharpening your Knife

1. Create THE BURR ON THE RIGHT HALF of the blade

Start by using the coarser, or lower grit, side of the sharpening stone.

Set the middle of the knife on the left side of the stone, making sure to keep the blade 15º off the stone. Rotate the blade clockwise in small circles, as you slowly move the blade towards the opposite side of the sharpening stone. As you move the blade, slowly roll it towards the right point of the knife, so that the point of contact with the stone slowly moves down the edge of the knife. Repeat this process until you've created a burr on the right have off the blade (if you don't know how to find the burr, don't lose your mind just yet, just keep reading). 

Rolling the blade as I go, moving the point of contact down the edge.

Rolling the blade as I go, moving the point of contact down the edge.

2. Creating a burr on the left half of the blade

After you've developed a burr on the right half of the blade, let's do the left. Set the middle of the blade on the right side of the stone. Rotate the knife counter clockwise this time, while moving the blade across the sharpening stone. As you move the knife across the stone, slowly roll the blade towards the point on the left side of the knife.

3. Finding the Burr 

So what is a burr anyways? A burr is the thinnest part of the edge that has begun to roll over as you've sharpened it. A rolled burr doesn't create good cuts, but it's a very good indicator that you've sharpened one side of your blade enough, and it's time to move onto the next. The burr will always develop on the opposite side of the blade that you were just sharpening, because the downward force you are putting on the knife is causing the edge to roll over towards you (once it's thin enough).

Okay, so admittedly, this burr can be a little difficult to find, especially if this is your first time sharpening a knife. Here's a few ways to find it. Before checking it though, make sure to pay attention to which side of the knife you created the burr on.

Run your thumb, very lightly (remember you're trying to make it sharp), across the top of the blade. If it glides right along with no resistance, there is no burr. One you start to feel some resistance, you'll know you have a burr. Unless you're really good, chances are there will be parts that have a burr and parts that do not. If that is the case, repeat step 1 and 2 until the burr runs across the entirety of the blade.

If you've done that, but still aren't sure if there's a burr or not, run your fingernail across the blade. Again, if it glides along, it's too dull and there's no burr. If it meets resistance, you've got your burr. It's unmistakable when you find the burr this way. If you're unsure at this point, you don't have a burr developed.

Some people find the burr by holding the knife up to the light and letting the glare hit the very edge. I've still not figured out how to find the burr this way, so all I'll just say is it's an option. Probably not a bad one either, since it doesn't run the risk of losing a finger.

4. Roll the burr over

This part is really important. If you don't roll the burr over, you're just going to grind it off when you start sharpening again. And that's going to make your knife more dull instead of sharp.

On the side of the knife you created the burr, which is the opposite side you just sharpened, set the knife on the coarse side of the stone. Using the same rolling motion you used in the previous method, run your knife across the stone. Where ever the edge is currently meeting the stone, you need to be pulling down into yourself. In other words, always be pulling the knife away from it's edge. It's a little hard to describe this motion, so check out the .gif. Make sure to do this motion about 20 times, or until the burr is no longer felt. 

5. Repeat on the other side of the knife

You created a burr on one side of the knife, and then flatted it back out. Now it's time to sharpen the other side of the knife. Set the side of the knife you haven't sharpened, which will be the side that had the burr on it, and repeat steps 1+2. Since you've already sharpened one side of the blade really well, the burr should develop a bit faster this time.

Once you've found the burr, repeat step 4, but this time do it on the smoother, or finer, grit side of the sanding stone. 

6. repeat entire process on the smooth/finer grit sanding stone

Hopefully you didn't think you were almost done, and if you did, at least your half way? Basically, you've got to repeat everything you've done, but this time is more about fine tuning instead of forming the edge itself.

Sharpening the left side, sharpen the right side, find the burr, roll it over, sharpen the other side of the blade (both left and right side), find the burr, and finally roll it over again.

After you've done that I do some light sharpening across the entire blade on both sides of the knife, just to smooth it out. 

Again you'll be using the rolling motion from before, but this time you'll be dragging the knife across the entire sanding stone. The trick with this one is to make sure you start and stop at the very beginning and end of the blade, maintaining the 15º the entire time.

Maintaining Your Knife

If you're sharpening your knife for the first time, don't stop at the previous step, make sure you strop too.

Now that you've established a nice edge to the blade of your knife, chances are you won't need to repeat the previous processes again any time soon... if you maintain your knife. And even if your knife does get a bit dull, you will only need to redo the edge on a fine grit side of the sharpening stone.

If you want to keep your blade sharp and making clean cuts, you should strop your knife every time you start to work. The good thing is that this step is pretty easy, and takes relatively little time.

Rub jeweler's rouge into a scrap piece of leather (preferably bigger than the one I used for this example... sorry).

Once the leather is loaded up with rouge, pull the knife downward, away from it's edge. Repeat this motion a few times, making sure you've hit all parts of the edge on both sides of the knife. 

Time to Celebrate

For two reasons really. You knife is now going to make beautiful cuts and you are no longer going to be frustrated with a dull knife. And, what's more, you got through this entire tutorial with out losing any fingers... at least I hope. If not... better luck next time?

As always, I hope you found this tutorial helpful. Also, I'd really love to see what you guys are making, but I realize that it's not the easiest to share pictures with me here. So follow me on Instagram and share your pictures with me there. If it's some of the best of your work, I'll be sure to feature it, so your work can inspire other craftsmen.

Working with Thin Leathers

Each piece of leather is unique and in general just has a lot of character. It’s what I love about leather. Somewhere along the way though, I had failed to apply that beyond just the look of leather. In other words, yes, each piece of leather looks different, and you can get many different kinds of leather that have been tanned differently, but that also means you need to treat them differently when working with them. I quickly found out that some of the skills I learned working with a very thick and stiff piece of leather, didn’t really apply to kinds of leathers that were thin and soft (even though it was still veg tanned). So let’s talk about working with thin leathers.

When cutting thin leathers: use a rotary cutter.

Unlike thicker leathers, soft leathers can snag if you don’t have a good balance between moving the blade downward and forward. This problem really only rears it’s head if your blade is dull, which is sometimes the case because I’ve yet to master sharpening. For this reason, I usually use a rotary cutter when it comes to thinner leathers. The blade itself is thinner than that of a round knife (especially a dull one) and has much less of a tendency to snag. If your blade of your rotary cutter is dull, they are easy to replace and easy to sharpen with a rotary blade sharpener. Alternatively, you could be really good at sharpening… I’ll get there one day!

When dying edges on thin leathers: use edge paint.

When I first started I don’t think I really understood the point of edge paint. It just seemed like something that was easier to mess up. Well no surprise, it actually has advantages, hence it’s popularity. The reality is that a lot of thin leathers, especially soft/supple ones just don’t burnish well. The fibers are simply too loose. So instead of using dye, that sinks into the leather and still allows you to burnish the leather itself, why not use something you sits on top of the leather and burnish that instead. This is the strength of edge paint. It adheres to, but doesn’t sink into the leather the way dye does, and is very easily burnished. It also tends to look much smoother than dyeing, unless you’re really proficient at sanding your edges smooth. That said, I find edge painting to be trickier than dyeing. As I mentioned, it’s easy to mess up, so make sure your using the right applicator (which Tandy sells for cheap). Before burnishing the paint you also need to make sure you build up a few layers of it. I plan to write a post about this a little bit later, but for now the general process is this:

When burnishing thin leathers: don’t use a burnisher.

Example of a mashed edge, even if a bit exaggerated.

This especially applies to thin leathers that aren’t soft and supple. Because of the downward force that a burnisher needs to create friction (especially when doing it by hand) the edges often get pushed down too hard and keep that shape because it’s a rigid leather. You can sometimes get away with it on very supple leathers, because they don’t hold shape well, but usually won’t burnish anyways. There’s a few ways to get around each of these problems.

Use a piece of canvas instead of a wooden burnisher. Often times I’m more pleased with my results from canvas anyways, but this is especially the case with thin leathers. The reality is that you can create a lot more heat with canvas with a lot less downward force. Basically, you can burnish with out mashing your edges. 

Using a wooden burnisher on a flat surface.

You can still use a wooden burnisher, but you’ll have to use it differently. To prevent a lot of force coming down on top of the edge, you can instead lay the piece of leather down and use the burnisher alongside it. This keeps the direction of your movement purely going across the edge, instead of into it. Do make sure to flip the piece of leather and do both sides of the edge.

When stitching thin leathers: cast the thread over your needle.

A lot of the times when you see a project made of thin leather, you’ll see one side of the stitching be very diagonal, but the other side be very flat. This is because the the threads don’t have a enough space to twist around the other before coming out the other side. One way I’ve heard it suggested to get around this problem is casting the thread over your needle before you start the stitch. It’s a little confusing, but it’s explained well here. After talking to some leatherworker friends and trying it out myself, I don’t think this always fixes the problem and think it may just be something you have to deal with. But, it is definitely worth trying out yourself. If you find a solution, let me know and drop it in the comments below.

Another small tip in addition to this: make sure you’re not pulling your thread too tight as you finish off your knot. On thiner leathers this can actually cause the leather to bunch. And in addition to your leather being ugly from bunching, your stitching will look uneven as well. So, tighten your knot with constant force, but not with all the force you have.

When beveling thin leathers: don't

Awhile ago, I had used a burnisher on a project made from thin leather and in addition to the edges getting mashed, the surface of the leather began to fold over. This can happen even if your using a piece of canvas. So naturally, I thought I’ll just use a beveler and get rid of it. Well… my beveler was a little bit too serious for a thin piece of leather, and I ended up just cutting off the entire edge. I know there are bevelers with a slighter angle that won’t cut as deep, but in general I don’t think it’s a good idea to bevel thin and supple leathers. Supple leathers especially don’t bevel well, and the process generally creates lots of snags. Instead I’ll usually sand those edges round with a high grit sand paper. It is a lot easier to make a mistake doing this by slipping and sanding the surface of the leather, so make sure you’re controlled when you do it. I start by sanding the top of the edge like you normally would, and then slowly angle my hand downward so I’m hitting the edge of the edge. I’m not sure that last sentence made sense, so here’s a picture to help out!

What I mean by "edge's edge."

Sanding the edge.

Sanding the edge's edge.

Sanding the edge's edge.

It’s really easy to get frustrated when you’re learning and working with different kinds of leather. You thought you had finally got your burnishing down (seriously it took me to long) only to fail at it on your next project that was made with a different leather. When you’re first starting it’s easy to think the problem is a lack of proficiency, which is generally the case, but do keep in mind it could be the type of leather. Hopefully these tips about beveling, stitching, burnishing, dyeing, and cutting thin leathers will help you keep your attention on what skills you need to keep practicing, as you work with many different kinds of leathers.


A Basic Guide to Stitching Leather

TIPS TO BEGIN AND TIPS TO IMPROVE

Stitching is one of those things that is fundamental to leatherworking, and is pretty hard to explain through text. So, I figured instead of trying to explain everything through writing, I'd switch it up a little and throw a video in this time! If you don't know how to stitch leather yet, this video will walk you through step by step. And if you've already learned to saddle stitch but aren't 100% happy with how it looks, I'd encourage you to still check out the video because there's some tips in there for you as well.


SO WHAT'S A SADDLE STITCH?

Saddle stitching is the most popular way to sew leather by hand, and it's for good reason too. It is one of the most durable ways to stitch leather because it locks at every stitch you make. This way, if the thread breaks somewhere, only one stitch will come undone, as opposed to the entire line of stitching, like it does with a machine stitch. You can see how the thread locks at every stitch in this image below provided by Kinz Leather.


THREADING THE NEEDLE

Before we jump right into stitching, let's first talk about how to thread your needle. It's nothing too hard, but here's some pictures to start off on the right foot.


SADDLE STITCH

This tutorial assumes that you've already created your stitching holes. To make sure that your make your stitching holes nice and straight, check out this post!

And that's it! Like I said, not that hard, right? Let me know what you think of the video, and please let me know if I can do anything to make it more helpful for you! If you'd like to learn about something else that would be best learned in video form, drop a suggestion in the comments below.